스마트폰 화면 전체를 window 라고 부른다
window는 백그라운드로 항상 깔려 있다
그 위에 올라가는 것이 activity
하나의 앱에는 여러개의 activity가 있다 (메인 로그인 회원가입 화면 등)
activity 위에는 SurfaceView가 올라간다
앱을 만든다는 것은 SurfaceView라는 하얀도화지에 그림을 그린다
뷰 - 그림
위젯 - 이벤트가 달려 있는 그림 - 안드로이드에서 제공하는 그림들 - 버튼 텍스트뷰 등등
머터리얼 -
위젯을 직접만드는 것은 쉽지 않고, 기존의 것을 커스텀하여 사용
activity는
(1)자바파일
-로직
(2)XML
-화면
위의 두가지가 onCreate에서 합쳐져서 출력된다
자바에서는 함수에 파라미터로 넘기지만
안드로이드에서는 시리얼 통신을 하여 데이터를 전송
버튼 내의 글자를 옮기기


속성을 줄때 id 아래에 주자
리니어 레이아웃 정리
<?xml version="1.0" encoding="utf-8"?>
<LinearLayout
xmlns:android="http://schemas.android.com/apk/res/android"
xmlns:app="http://schemas.android.com/apk/res-auto"
xmlns:tools="http://schemas.android.com/tools"
android:orientation="vertical"
android:layout_width="match_parent"
android:layout_height="match_parent"
tools:context=".MainActivity">
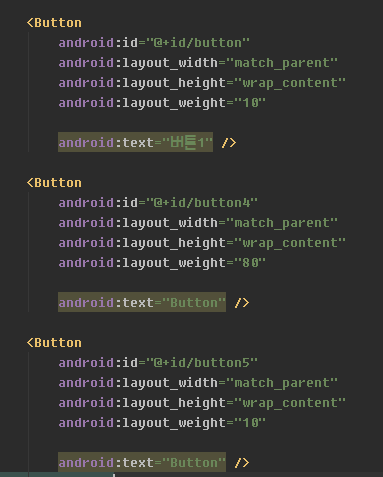
<Button
android:id="@+id/button"
android:layout_weight="1"
android:gravity="left"
android:layout_width="100dp"
android:layout_height="0dp"
android:text="b1" />
<Button
android:id="@+id/button2"
android:layout_weight="1"
android:gravity="right"
android:layout_gravity="right"
android:layout_width="100dp"
android:layout_height="0dp"
android:text="b2" />
<Button
android:id="@+id/button3"
android:layout_weight="1"
android:layout_gravity="center"
android:layout_width="100dp"
android:layout_height="0dp"
android:text="b3" />
</LinearLayout>
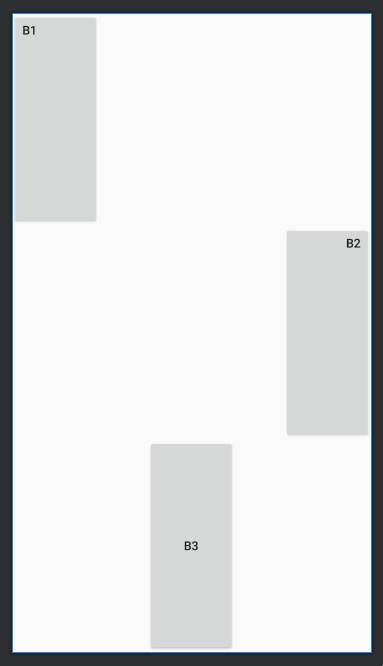
렐러티브 레이아웃

리니어가 아니기 때문에 오리엔테이션이 필요 없다

버튼 2개를 추가했으나 겹쳐버린다


-------------------


---------------------
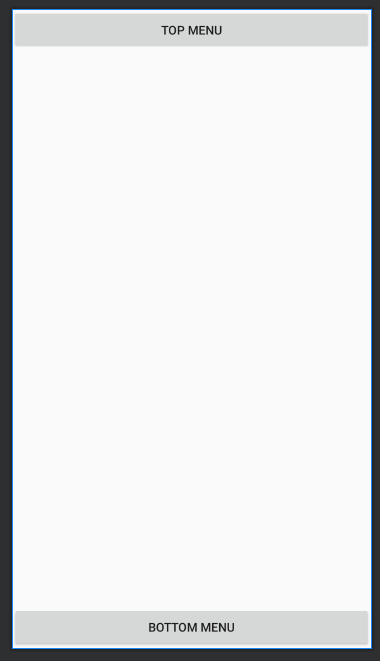
위아래 배치
<?xml version="1.0" encoding="utf-8"?>
<RelativeLayout
    xmlns:android="http://schemas.android.com/apk/res/android"
    xmlns:app="http://schemas.android.com/apk/res-auto"
    xmlns:tools="http://schemas.android.com/tools"
    android:layout_width="match_parent"
    android:layout_height="match_parent"
    tools:context=".MainActivity">


    <Button
        android:id="@+id/btn1"
        android:layout_alignParentTop="true"
        android:layout_width="match_parent"
        android:layout_height="wrap_content"
        android:text="Top Menu" />

    <Button
        android:id="@+id/btn2"
        android:layout_alignParentBottom="true"
        android:layout_width="match_parent"
        android:layout_height="wrap_content"
        android:text="Bottom Menu" />


</RelativeLayout>
리니어로 위와같이 하려면 마진을 엄청 줘야하고 불편하다
그래서 렐러티브를 이용한다

드래그하면 코드 위치가 바뀐다
부모와의 관계


start 는 시작위치가 위인지 왼쪽인지 상관없이 시작지점

다른 컴포넌트의 아래에 배치

---------------------

btn2의 위쪽에 배치

-----------------

<?xml version="1.0" encoding="utf-8"?>
<RelativeLayout
    xmlns:android="http://schemas.android.com/apk/res/android"
    xmlns:app="http://schemas.android.com/apk/res-auto"
    xmlns:tools="http://schemas.android.com/tools"
    android:layout_width="match_parent"
    android:layout_height="match_parent"
    tools:context=".MainActivity">


    <Button
        android:id="@+id/btn1"
        android:layout_alignParentTop="true"
        android:layout_width="wrap_content"
        android:layout_height="wrap_content"
        android:text="Top Menu1" />

    <Button
        android:id="@+id/btn4"
        android:layout_toRightOf="@id/btn1"
        android:layout_width="wrap_content"
        android:layout_height="wrap_content"
        android:text="Top Menu2" />

    <Button
        android:id="@+id/btn3"
        android:layout_below="@id/btn1"
        android:layout_above="@id/btn2"
        android:layout_width="match_parent"
        android:layout_height="match_parent"
        android:text="Bottom Menu" />

    <Button
        android:id="@+id/btn2"
        android:layout_alignParentBottom="true"
        android:layout_width="match_parent"
        android:layout_height="wrap_content"
        android:text="Bottom Menu" />


</RelativeLayout>
---------------


----------------


겹쳐버린다
-------------

렐러티브 레이아웃은 HTML의 div 와 같은 역할
-----------

--------------

<?xml version="1.0" encoding="utf-8"?>
<RelativeLayout
    xmlns:android="http://schemas.android.com/apk/res/android"
    xmlns:app="http://schemas.android.com/apk/res-auto"
    xmlns:tools="http://schemas.android.com/tools"
    android:layout_width="match_parent"
    android:layout_height="match_parent"
    tools:context=".MainActivity">


    <RelativeLayout
        android:id="@+id/top"
        android:layout_width="wrap_content"
        android:layout_height="wrap_content">

        <Button
            android:id="@+id/btn1"
            android:layout_alignParentTop="true"
            android:layout_width="wrap_content"
            android:layout_height="wrap_content"
            android:text="Top Menu1" />

        <Button
            android:id="@+id/btn4"
            android:layout_marginLeft="10dp"
            android:layout_marginTop="20dp"
            android:layout_toRightOf="@id/btn1"
            android:layout_width="wrap_content"
            android:layout_height="wrap_content"
            android:text="Top Menu2" />

    </RelativeLayout>

    <Button
        android:id="@+id/btn3"
        android:layout_below="@id/top"
        android:layout_above="@id/btn2"
        android:layout_width="match_parent"
        android:layout_height="match_parent"
        android:text="Bottom Menu" />

    <Button
        android:id="@+id/btn2"
        android:layout_alignParentBottom="true"
        android:layout_width="match_parent"
        android:layout_height="wrap_content"
        android:text="Bottom Menu" />


</RelativeLayout>
------------------
뎁스depth가 있으면 있을수록 느려진다
---------------
애매한 위치에 배치하려면 margin을 줘야한다
---------------
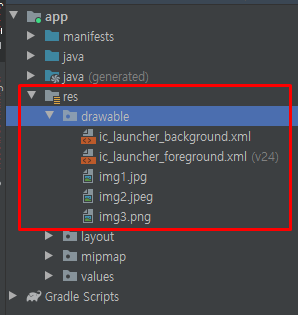
사진 저장 위치
----------------


가중치가 자동으로 잡힌다

width를 0으로 하고 height를 match_parent로 설정

---------------

<TextView
android:id="@+id/textView"
android:textSize="25sp"
android:textStyle="bold"
android:gravity="center"
android:layout_width="0dp"
android:layout_height="match_parent"
android:layout_weight="1"
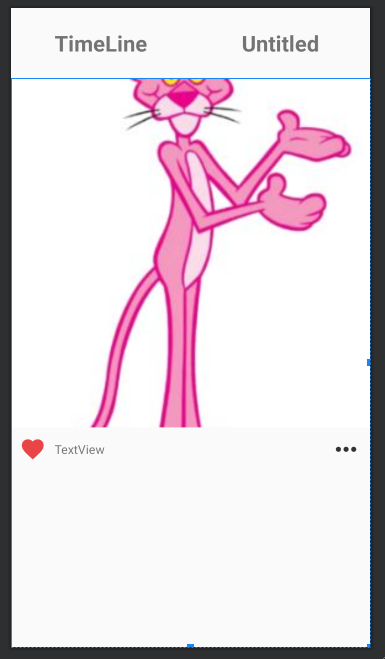
android:text="TimeLine" />-------------------


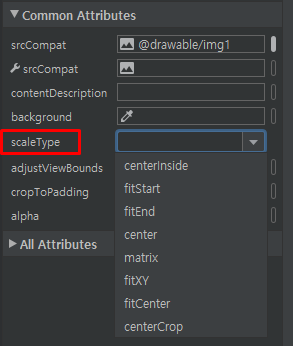
이미지 구성

스케일 타입 centerCrop
------------------------------

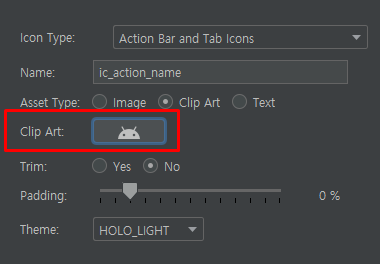
클립아트 만들 때 하는 것
---------------------


---------------------
렐러티브
이미지뷰 텍스트뷰 이미지뷰
<?xml version="1.0" encoding="utf-8"?>
<LinearLayout xmlns:android="http://schemas.android.com/apk/res/android"
    xmlns:app="http://schemas.android.com/apk/res-auto"
    xmlns:tools="http://schemas.android.com/tools"
    android:layout_width="match_parent"
    android:layout_height="match_parent"
    android:orientation="vertical"
    tools:context=".MainActivity">


    <LinearLayout
        android:layout_width="match_parent"
        android:layout_height="80dp"
        android:orientation="horizontal">

        <TextView
            android:id="@+id/textView"
            android:layout_width="0dp"
            android:layout_height="match_parent"
            android:layout_weight="1"
            android:gravity="center"
            android:text="TimeLine"
            android:textSize="25sp"
            android:textStyle="bold" />

        <TextView
            android:id="@+id/textView2"
            android:layout_width="0dp"
            android:layout_height="match_parent"
            android:layout_weight="1"
            android:gravity="center"
            android:text="Untitled"
            android:textSize="25sp"
            android:textStyle="bold" />

    </LinearLayout>

    <LinearLayout
        android:orientation="vertical"
        android:layout_width="match_parent"
        android:layout_height="match_parent">

        <ImageView
            android:id="@+id/imageView2"
            android:layout_width="match_parent"
            android:layout_height="400dp"
            android:scaleType="centerCrop"
            app:srcCompat="@drawable/img1" />

        <RelativeLayout
            android:layout_width="match_parent"
            android:layout_height="50dp">


            <ImageView
                android:id="@+id/imageView3"
                android:layout_marginLeft="10dp"
                android:layout_width="30dp"
                android:layout_height="match_parent"
                android:layout_alignParentLeft="true"
                app:srcCompat="@drawable/ic_favorite" />

            <TextView
                android:id="@+id/textView3"
                android:gravity="center"
                android:layout_marginLeft="10dp"
                android:layout_toRightOf="@id/imageView3"
                android:layout_width="wrap_content"
                android:layout_height="match_parent"
                android:text="TextView" />

            <ImageView
                android:id="@+id/imageView4"
                android:layout_width="35dp"
                android:layout_marginRight="10dp"
                android:layout_height="match_parent"
                android:layout_alignParentRight="true"
                app:srcCompat="@drawable/ic_more" />
        </RelativeLayout>

    </LinearLayout>

</LinearLayout>
-----------------------


-------------------

<RelativeLayout
            android:layout_width="match_parent"
            android:layout_height="60dp">

            <TextView
                android:id="@+id/tv_username"
                android:layout_width="wrap_content"
                android:layout_height="wrap_content"
                android:text="아이디"
                android:textStyle="bold"
                android:textSize="25sp">

            </TextView>

            <TextView
                android:id="@+id/tv_comment"
                android:layout_marginLeft="10dp"
                android:layout_toRightOf="@id/tv_username"
                android:layout_width="wrap_content"
                android:layout_height="wrap_content"
                android:text="내용"
                android:textSize="25sp">

            </TextView>

        </RelativeLayout>

---------------------
XML파일에서 컴포넌트들은 클래스이기 때문에 첫글자를 대문자로 해야한다
---------------------

--------------------

<?xml version="1.0" encoding="utf-8"?>
<LinearLayout xmlns:android="http://schemas.android.com/apk/res/android"
xmlns:app="http://schemas.android.com/apk/res-auto"
xmlns:tools="http://schemas.android.com/tools"
android:layout_width="match_parent"
android:layout_height="match_parent"
android:orientation="vertical"
tools:context=".MainActivity">
<LinearLayout
android:layout_width="match_parent"
android:layout_height="80dp"
android:orientation="horizontal">
<TextView
android:id="@+id/textView"
android:layout_width="0dp"
android:layout_height="match_parent"
android:layout_weight="1"
android:gravity="center"
android:text="TimeLine"
android:textSize="25sp"
android:textStyle="bold" />
<TextView
android:id="@+id/textView2"
android:layout_width="0dp"
android:layout_height="match_parent"
android:layout_weight="1"
android:gravity="center"
android:text="Untitled"
android:textSize="25sp"
android:textStyle="bold" />
</LinearLayout>
<ScrollView
android:layout_width="match_parent"
android:layout_height="match_parent">
<!-- 스크롤뷰는 레이아웃을 하나 밖에 못둔다 레이아웃으로 묶기-->
<LinearLayout
android:layout_width="match_parent"
android:layout_height="match_parent"
android:orientation="vertical">
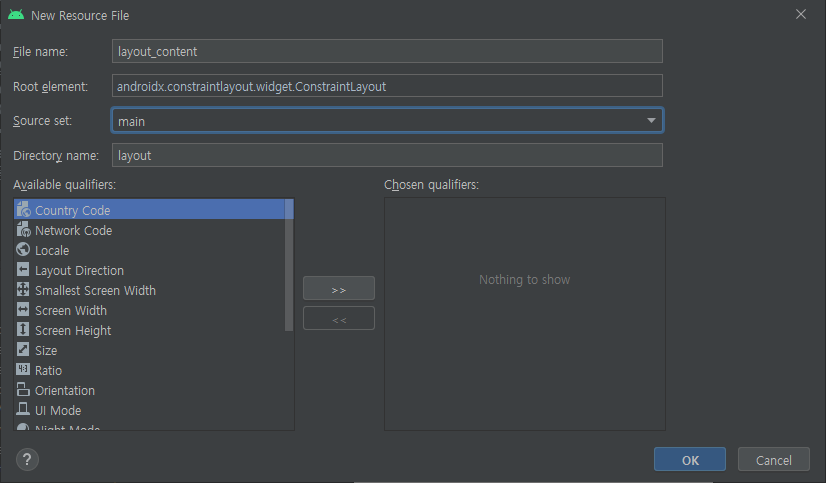
<include layout="@layout/layout_content" />
<include layout="@layout/layout_content" />
<include layout="@layout/layout_content" />
</LinearLayout>
</ScrollView>
</LinearLayout>-------------------------
'App > Android' 카테고리의 다른 글
| 200714 / 안드로이드 기초 / 인스타그램 로그인페이지 만들기 / 계산기 만들기 (0) | 2020.07.14 |
|---|---|
| 인스타그램 UI 만들기 (0) | 2020.07.09 |
| 안드로이드 // 레이아웃 구성 (0) | 2020.07.08 |
| 안드로이드 // 기본 세팅 (0) | 2020.07.08 |
| 안드로이드 개발 가이드 (0) | 2020.07.08 |