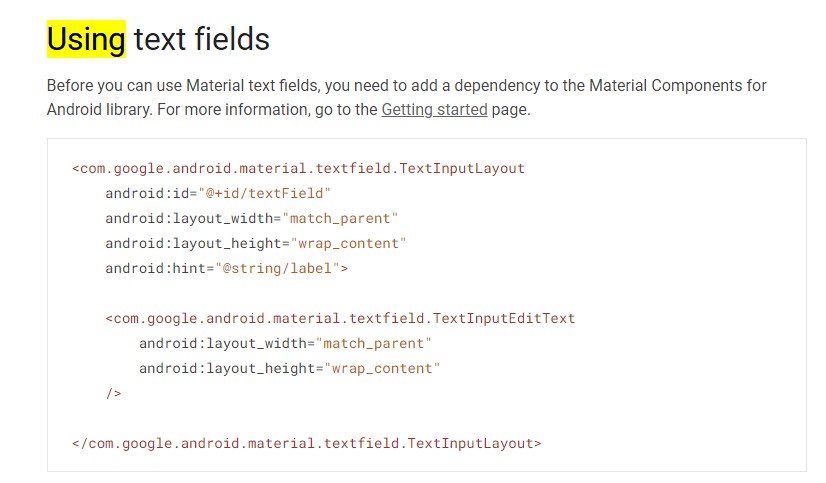
파이썬 플라스크 서버(가장 간단한 서버 )
템플레이트를 html로 사용한다


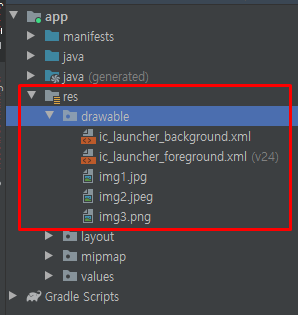
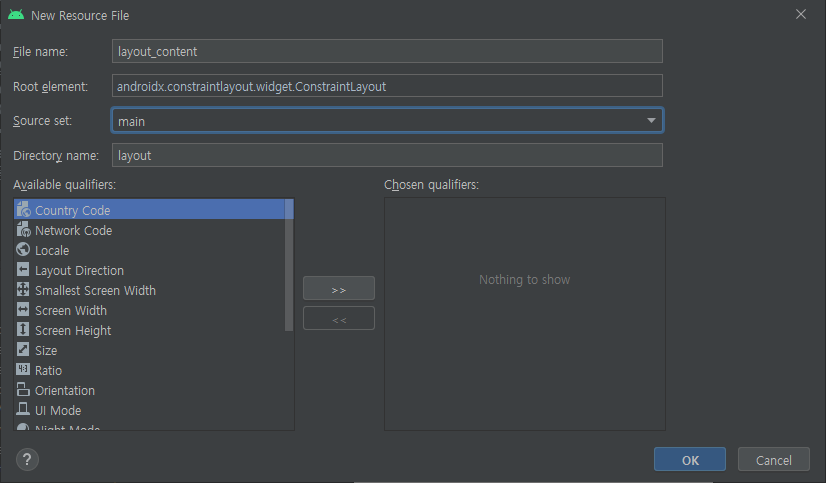
res폴더 안의 폴더명은 이미 정해져 있다
위처럼 하지 않고 res에서 바로 뉴리소스파일을 선택해도 아래와 같이 가능


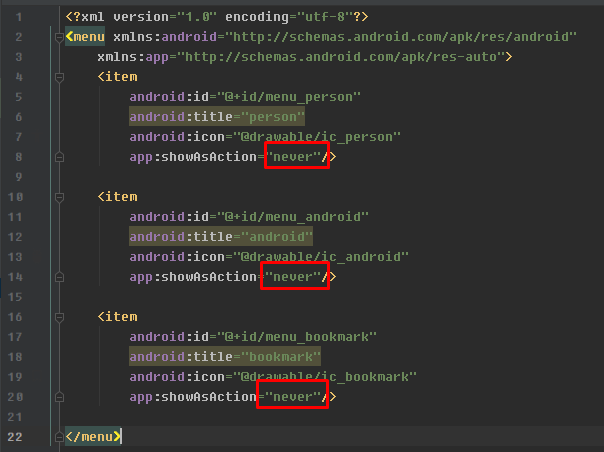
menu_main.xml

꺾쇠를 닫아놓고 작업해야 에러를 확인 할 수 있다


인플레이터 (메모리에 띄워주는 역할)
- xml파일을 자바코드로 바꾸고 메모리에 올리고, new 해준 것을 그림을 그린다


기본 제공 메뉴
액션바는 기본제공 메뉴를 쓰지않고 직접만들어 쓰는 것이 많다고 한다


라이브러리는 androidx 로 되어있는 것을 꼭 쓰자
androidx가 아닌 라이브러리를 쓰면 플레이스토어에 배포가 되지 않는다

툴바의 고질적인 문제 왼쪽에 빈공간이 생기는 점
공간 없애는 방법이 있다


빈공간이 사라졌다
이러한 빈공간을 inset이라고 한다
카메라구멍이나 통화 스피커나 키보드 등 화면이 안그려도되는 빈공간을 인셋이라고 한다
레이아웃이나 일반 컴포넌트면 merge 안에 넣는것이 좋고 Toolbar는 굳이 넣을 필요 없다
<?xml version="1.0" encoding="utf-8"?>
<LinearLayout
    xmlns:android="http://schemas.android.com/apk/res/android"
    xmlns:app="http://schemas.android.com/apk/res-auto"
    xmlns:tools="http://schemas.android.com/tools"
    android:layout_width="match_parent"
    android:layout_height="match_parent"
    tools:context=".MainActivity">

    <include layout="@layout/toolbar_main"/>

</LinearLayout>
include 하여 툴바를 추가한다

메인과 합쳐졌다

https://material.io/develop/android/components/navigation-view
Material Design
Build beautiful, usable products faster. Material Design is an adaptable system—backed by open-source code—that helps teams build high quality digital experiences.
material.io
옆으로 슬라이딩 되는 메뉴가 있다면 draw layout이라고 보면된다


----------------------
롬복 설치하는 법 file setting 검색

그래들 디펜던시 추가

--------------------
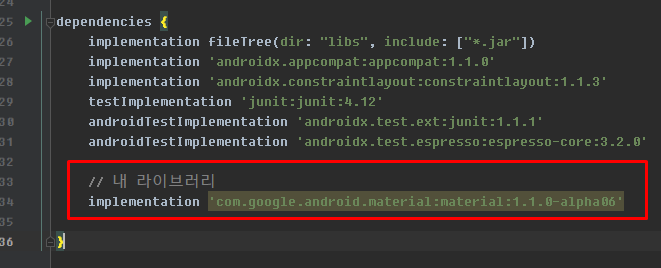
머터리얼 api 추가하는 법


----------------


----------------------
package com.jaybon.app2;

import androidx.appcompat.app.AppCompatActivity;

import android.os.Bundle;
import android.util.Log;
import android.view.Menu;
import android.view.View;
import android.widget.ImageView;

public class MainActivity extends AppCompatActivity {

    private static final String TAG = "Main_Activity";

    private ImageView ivMenu;

    @Override
    protected void onCreate(Bundle savedInstanceState) {
        super.onCreate(savedInstanceState);
        setContentView(R.layout.activity_main);

        ivMenu = findViewById(R.id.iv_menu);

        ivMenu.setOnClickListener(new View.OnClickListener() {
            @Override
            public void onClick(View view) {
                Log.d(TAG, "onClick: 클릭됨");
            }
        });
    }

    @Override
    public boolean onCreateOptionsMenu(Menu menu) {

        getMenuInflater().inflate(R.menu.menu_main, menu);
        return false;
    }
}

슬라이딩 뷰에 접근하려면 드로우 레이아웃의 id가 필요하다


ctrl + Q 하면


------------------
툴바를 커스텀해서 넣으면 그 툴바는 액션바로 인식하지 못한다
액션바로 인식하도록 만들어야함
------------------


--------------------------
땡땡땡1

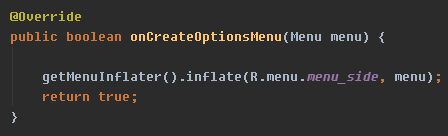
menu_side로 바꾸기
---------------------------

나중에 해보기
https://material.io/components/menus
Material Design
Build beautiful, usable products faster. Material Design is an adaptable system—backed by open-source code—that helps teams build high quality digital experiences.
material.io
http://i5on9i.blogspot.com/2013/12/action-bar-option-menu-icon.html
[컴][안드로이드] action bar 위의 option menu icon 바꾸는 방법
option menu icon 바꾸는 방법 / 옵션 메뉴 아이콘 변경 / 액션바의 옵션 메뉴 아이콘 변경 option menu 가 존재하면 action bar 에 icon 이 보여진다. 보통 아래와 같은 모양으로 나타난다. 이 보양을 다른 아.
i5on9i.blogspot.com
----------------------------
옵션메뉴 버튼 색깔 바꾸기
안드로이드 옵션 메뉴 버튼 색상 바꾸기
안드로이드 옵션 메뉴 버튼 색상 바꾸기.안드로이드 액티비티 툴바에 보면 화살표로 가리킨 아이콘이 있다....
blog.naver.com
----------------------------


--------------------
액티비티를 여러개 만들어서 이동해야하는데
액티비티 전환없이 사용
화면하나에 여러개의 프래그먼트를 넣고
프래그먼트를 이동하면서 사용하면 하나의 페이지로 여러가지 화면을 사용할 수 있다
-------------------------------
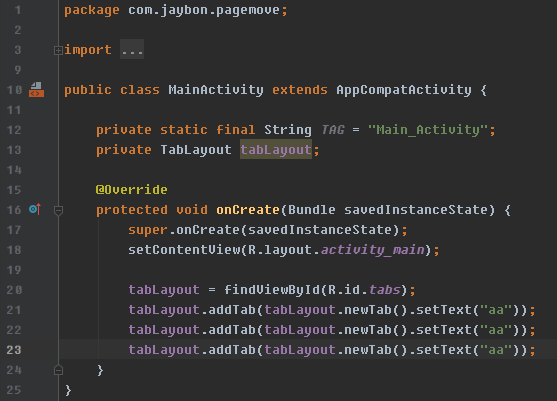
탭 레이아웃

https://material.io/develop/android/components/tabs
Material Design
Build beautiful, usable products faster. Material Design is an adaptable system—backed by open-source code—that helps teams build high quality digital experiences.
material.io

탭레이아웃으로 프래그먼트를 쓰면 해당 아이템들만 뜬다
----
자바코드로도 가능

-----------------
뷰페이저는 탭레이아웃과 연결시킬 수 있다
이 3개는 메모리에 안뜬다 (코드로 띄워야함)


프래그먼트도 자기만의 자바파일이 필요하다


프래그먼트를 바꿔주는 어댑터가 필요하다
ctrl + o


-------------
안드로이드에서는 데이터를 이용할 때에는 무조건 어댑터를 쓰게되어있다
------------
책 287 프래그먼트 확인
--------------
프래그먼트 쉬운버전


어댑터를 안만들것이기 때문에 메모리에 띄워줄 애가 필요하다
onCreateView
자바파일만들기


MainActivity.java
package com.jaybon.frag2;

import androidx.appcompat.app.AppCompatActivity;
import androidx.fragment.app.Fragment;

import android.os.Bundle;
import android.view.View;
import android.widget.Button;

public class MainActivity extends AppCompatActivity {

    private Button btn1, btn2;
    private Fragment fragment1, fragment2;


    @Override
    protected void onCreate(Bundle savedInstanceState) {
        super.onCreate(savedInstanceState);
        setContentView(R.layout.activity_main);

        fragment1 = new Frag1();
        fragment2 = new Frag2();

        btn1 = findViewById(R.id.btn1);
        btn2 = findViewById(R.id.btn2);

        btn1.setOnClickListener(new View.OnClickListener() {
            @Override
            public void onClick(View v) {

                // commit이 호출될때 onCreateView가 실행된다
                // onCreateView에 R.id.frame_container가 들어간다
                getSupportFragmentManager().beginTransaction().replace(R.id.frame_container, fragment1).commit();
            }
        });

        btn2.setOnClickListener(new View.OnClickListener() {
            @Override
            public void onClick(View v) {

                // commit이 호출될때 onCreateView가 실행된다
                // onCreateView에 R.id.frame_container가 들어간다
                getSupportFragmentManager().beginTransaction().replace(R.id.frame_container, fragment2).commit();
            }
        });

    }
}

간단한것은 비긴트랜잭션 // 다양한건 뷰페이저와 어댑터
--------------
'App > Android' 카테고리의 다른 글
| 안드로이드 // 200722 // 네비게이션 아이템 클릭 / 액티비티 매니저 서비스 / 스크롤뷰 -> 리스트뷰 -> 리사이클러뷰 (0) | 2020.07.22 |
|---|---|
| 안드로이드 // 200716 / bottom navigation / 바텀 네비게이션 (0) | 2020.07.16 |
| 200714 / 안드로이드 기초 / 인스타그램 로그인페이지 만들기 / 계산기 만들기 (0) | 2020.07.14 |
| 인스타그램 UI 만들기 (0) | 2020.07.09 |
| 200709 / 리니어 레이아웃으로 화면구성 / (0) | 2020.07.09 |